Posts here are mostly step-by-step guides on how to replicate something I have set up in the past. Read over my About page to see how I show commands/output and read the disclaimer.
This setup will be similar to my PXE installation server setup. You will find that the networking setup will be nearly identical.
This guide assumes existing knowledge in Ubuntu Server, PXE, dnsmasq.
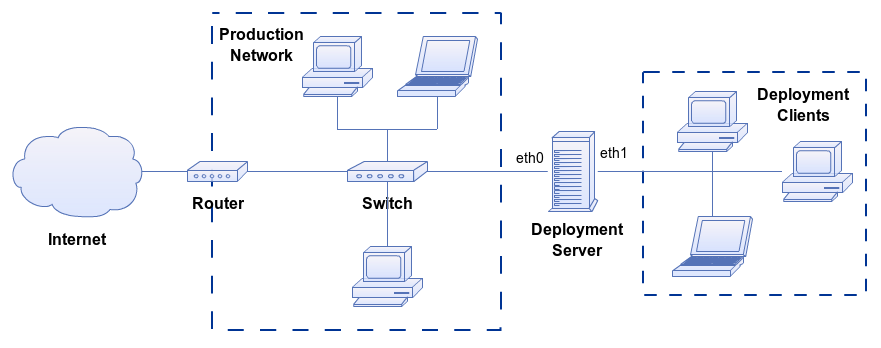
This server sits between two networks – my main production network, and a network that the clients sit in. The physical arrangement of the environment looks something like this:
Base OS Installation
Install Ubuntu 12.04 Server with SSH access. We will install the required packages for PXE / TFTP later.
Be sure we are on the latest updates:
[root]$ apt-get update
[root]$ apt-get dist-upgrade
Some basic reminders: Set account passwords, bash prompts, etc.
Network Configuration
Configure the network interfaces to something like this. The idea is to statically configure one of the interfaces for the PXE and DHCP server to function. The iptables rules are for internet routing.
[root]$ vim /etc/network/interfaces
auto eth0
iface eth0 inet dhcp
    post-up iptables-restore < /etc/iptables.up.rules

auto eth1
iface eth1 inet static
    address 192.168.25.254
    netmask 255.255.255.0
    broadcast 192.168.25.255
Since this machine will be serving as a DNS server, we need the hostname to be pointing to the non-local IP address, so if the server name is dev-live.example.com, and the IP address is 192.168.25.254, that entry in /etc/hosts will contain something like this:
192.168.25.254 dev-live dev-live.example.com
Internet Routing
The clients that are on the eth1 side may require internet access. The easiest way to do this is to configure NAT. This set of commands will allow a computer connected to the internal interface to access the outside network.
Clear out any existing rules.
[root]$ iptables --flush
[root]$ iptables --table nat --flush
[root]$ iptables --delete-chain
[root]$ iptables --table nat --delete-chain
Configure NAT rules. These commands assume eth0 is connected to the outside network/internet.
[root]$ iptables --table nat --append POSTROUTING --out-interface eth0 -j MASQUERADE
[root]$ iptables --append FORWARD --in-interface eth1 -j ACCEPT
Configure iptables to restore the rules when eth0 comes back up.
[root]$ iptables-save > /etc/iptables.up.rules
Make sure this entry is in /etc/network/interfaces under eth0. (It should if the network setup section was followed)
post-up iptables-restore < /etc/iptables.up.rules
Enable IP routing.
[root]$ echo 1 > /proc/sys/net/ipv4/ip_forward
Make IP routing stick across reboots:
[root]$ vim /etc/sysctl.conf
#...
# Uncomment the next line to enable packet forwarding for IPv4
net.ipv4.ip_forward=1
#...
dnsmasq
DNSMasq is my preferred application for PXE booting clients. This allows us to configure DHCP, DNS, and TFTP all in one go.
[root]$ apt-get install dnsmasq
We are going to start from a blank config file instead of using /etc/dnsmasq.conf
[root]$ vim /etc/dnsmasq.d/pxe.conf
We are going to add to the file later, but let's start with this:
# We only want this running on the interface facing the dedicated PXE network
interface=eth1

# Adding the unique domain name allows me to see that I'm in the PXE subnet
expand-hosts
domain=live.example.com

# PXE Subnet
dhcp-range=192.168.25.100,192.168.25.200,12h
Restart dnsmasq.
[root]$ service dnsmasq restart
Checkpoint One
- Reboot dev-live
- Verify that
eth0is up with an IP address from the production network. - Ping
google.comor something to verify connectivity. - Verify that
eth1is up and has the correct IP address configured. - Boot up a spare laptop/desktop with a working OS installed.
- Connect the spare machine to
eth1ofdev-live. - Verify that the spare machine received an IP address and can reach the internet.
PXE Boot and TFTP Support
The first step is to add the config to serve the PXE options through DHCP.
[root]$ vim /etc/dnsmasq.d/pxe.conf
Add these lines:
# PXE Boot Options
pxe-service=x86PC, "Boot from local disk"
pxe-service=x86PC, "----"
pxe-service=x86PC, "----"
pxe-service=x86PC, "Live CD Images", pxelinux
pxe-service=x86PC, "----"

# TFTP Configuration
enable-tftp
tftp-root=/srv/images
What are we doing here? The first block configures the menu items. The first three lines will boot the local HDD. I have the deployment option several options down to prevent accidental selection. The last few options configure TFTP.
Restart dnsmasq.
[root]$ service dnsmasq restart
Now we create the PXE boot image layout.
[root]$ mkdir -p /srv/images/pxelinux.cfg
[root]$ cd /srv/images/
[root]$ wget http://archive.ubuntu.com/ubuntu/dists/precise-updates/main/installer-i386/current/images/netboot/ubuntu-installer/i386/pxelinux.0
[root]$ wget http://archive.ubuntu.com/ubuntu/dists/precise-updates/main/installer-i386/current/images/netboot/ubuntu-installer/i386/boot-screens/vesamenu.c32
Configuring the NFS Server
TFTP will be serving the initial Linux boot images, but NFS will be serving the rest of the ISO content.
[root]$ apt-get install nfs-kernel-server
[root]$ vim /etc/exports
Add this:
/srv/images *(ro,sync,no_wdelay,insecure_locks,no_root_squash,insecure,no_subtree_check)
[root]$ service nfs-kernel-server restart
Saving the ISO Images
This guide will cover booting live CD images for a couple different Ubuntu versions. You can adapt these procedures for other distros as well.
Save the ISO images to /srv/images. How you get them there is up to you. These are the ones I have saved:
/srv/images
├── ubuntu-13.10-desktop-amd64.iso
├── ubuntu-13.10-desktop-i386.iso
├── xubuntu-12.04.3-desktop-amd64.iso
├── xubuntu-12.04.3-desktop-i386.iso
├── xubuntu-13.10-desktop-amd64.iso
└── xubuntu-13.10-desktop-i386.iso
Once you have them all saved, we will need to extract them. I will use 7zip to accomplish this.
[root]$ apt-get install p7zip-full
Use something like the below commands to extract the ISO images. Your exact procedure will vary depending on the ISOs that were downloaded. I use the name of the ISO as the directory name, as shown below.
[root]$ cd /srv/images
[root]$ 7z x xubuntu-12.04.3-desktop-amd64.iso -o"xubuntu-12.04.3-desktop-amd64"
[root]$ 7z x xubuntu-12.04.3-desktop-i386.iso -o"xubuntu-12.04.3-desktop-i386"
[root]$ 7z x xubuntu-13.10-desktop-amd64.iso -o"xubuntu-13.10-desktop-amd64"
[root]$ 7z x xubuntu-13.10-desktop-i386.iso -o"xubuntu-13.10-desktop-i386"
[root]$ 7z x ubuntu-13.10-desktop-amd64.iso -o"ubuntu-13.10-desktop-amd64"
[root]$ 7z x ubuntu-13.10-desktop-i386.iso -o"ubuntu-13.10-desktop-i386"
Yeah, you could script this - and probably should if you are doing a bunch of them.
Now we should see a directory for each ISO.
/srv/images
├── ubuntu-13.10-desktop-amd64
├── ubuntu-13.10-desktop-i386
├── xubuntu-12.04.3-desktop-amd64
├── xubuntu-12.04.3-desktop-i386
├── xubuntu-13.10-desktop-amd64
├── xubuntu-13.10-desktop-i386
├── ubuntu-13.10-desktop-amd64.iso
├── ubuntu-13.10-desktop-i386.iso
├── xubuntu-12.04.3-desktop-amd64.iso
├── xubuntu-12.04.3-desktop-i386.iso
├── xubuntu-13.10-desktop-amd64.iso
└── xubuntu-13.10-desktop-i386.iso
Grub Boot Menu
Ready for the fun part? Now we build the Grub boot menu. I can feel your excitement!
[root]$ vim /srv/images/pxelinux.cfg/default
The menu entries took me some time to get right. The CD content has to be served through NFS. The boot images are being served through TFTP. Remember, we have the TFTP and NFS root pointed to /srv/images.
menu title Live CD Choices

label xubuntu-12.04.3-desktop-i386
    menu label Xubuntu 12.04.3 Desktop i386
    kernel xubuntu-12.04.3-desktop-i386/casper/vmlinuz
    append boot=casper netboot=nfs nfsroot=192.168.25.254:/srv/images/xubuntu-12.04.3-desktop-i386 initrd=xubuntu-12.04.3-desktop-i386/casper/initrd.lz verbose

default vesamenu.c32
prompt 0
timeout 0
File Permissions
During my initial testing, I found that dnsmasq-tftp did not want to read the boot images in the ISO folders. When I selected the menu options in the Grub menu, the selection would just sit there, and this permission denied message appeared in the syslog:
[root]$ tail /var/log/syslog
Feb 20 20:26:16 dev-live dnsmasq-dhcp[8428]: DHCP, IP range 192.168.25.100 -- 192.168.25.200, lease time 12h
Feb 20 20:26:16 dev-live dnsmasq-tftp[8428]: TFTP root is /srv/images
Feb 20 20:26:16 dev-live dnsmasq[8428]: reading /var/run/dnsmasq/resolv.conf
Feb 20 20:26:16 dev-live dnsmasq[8428]: using nameserver 192.168.10.254#53
Feb 20 20:26:16 dev-live dnsmasq[8428]: read /etc/hosts - 7 addresses
Feb 20 20:26:20 dev-live dnsmasq[8428]: reading /var/run/dnsmasq/resolv.conf
Feb 20 20:26:20 dev-live dnsmasq[8428]: using nameserver 192.168.10.254#53
Feb 20 20:26:20 dev-live dnsmasq-tftp[8428]: cannot access /srv/images/xubuntu-12.04.3-desktop-i386/casper/vmlinuz: Permission denied
Feb 20 20:27:40  dnsmasq-tftp[8428]: last message repeated 4 times
Note that permission denied error message. This was the first time I've used 7z to extract something, so I took a quick look at the man page, and found this:
Backup and limitations
       DO NOT USE the 7-zip format for backup purpose on Linux/Unix because :
        - 7-zip does not store the owner/group of the file.
Ok, so we know that 7z doesn't do well with file/directory permissions. Running the below commands will return the permissions to where they should be.
[root]$ find /srv/images -type d -exec chmod 755 {} \;
[root]$ find /srv/images -type f -exec chmod 644 {} \;
Remember that the permissions will need to be fixed each time a new ISO is extracted.
Checkpoint Two
- Reboot
dev-live - Connect a computer to the eth1 network of
dev-live. Boot up this machine using PXE. - Navigate the boot menu to the single menu entry we created
Adding More Menu Options
I have several other ISO images to create menu entries for.
[root]$ vim /srv/images/pxelinux.cfg/default
Below are the remaining boot options. You may have different options if you are using different ISO images.
Also note that ubuntu-13.10-desktop-amd64 points to vmlinuz.efi, not vmlinuz.
label xubuntu-12.04.3-desktop-amd64
    menu label Xubuntu 12.04.3 Desktop amd64
    kernel xubuntu-12.04.3-desktop-amd64/casper/vmlinuz
    append boot=casper netboot=nfs nfsroot=192.168.25.254:/srv/images/xubuntu-12.04.3-desktop-amd64 initrd=xubuntu-12.04.3-desktop-amd64/casper/initrd.lz verbose

label xubuntu-13.10-desktop-i386
    menu label Xubuntu 13.10   Desktop i386
    kernel xubuntu-13.10-desktop-i386/casper/vmlinuz
    append boot=casper netboot=nfs nfsroot=192.168.25.254:/srv/images/xubuntu-13.10-desktop-i386 initrd=xubuntu-13.10-desktop-i386/casper/initrd.lz verbose

label xubuntu-13.10-desktop-amd64
    menu label Xubuntu 13.10   Desktop amd64
    kernel xubuntu-13.10-desktop-amd64/casper/vmlinuz
    append boot=casper netboot=nfs nfsroot=192.168.25.254:/srv/images/xubuntu-13.10-desktop-amd64 initrd=xubuntu-13.10-desktop-amd64/casper/initrd.lz verbose

label ubuntu-13.10-desktop-i386
    menu label Ubuntu  13.10   Desktop i386
    kernel ubuntu-13.10-desktop-i386/casper/vmlinuz
    append boot=casper netboot=nfs nfsroot=192.168.25.254:/srv/images/ubuntu-13.10-desktop-i386 initrd=ubuntu-13.10-desktop-i386/casper/initrd.lz verbose

label ubuntu-13.10-desktop-amd64
    menu label Ubuntu  13.10   Desktop amd64
    kernel ubuntu-13.10-desktop-amd64/casper/vmlinuz.efi
    append boot=casper netboot=nfs nfsroot=192.168.25.254:/srv/images/ubuntu-13.10-desktop-amd64 initrd=ubuntu-13.10-desktop-amd64/casper/initrd.lz verbose
Adding CentOS (TODO)
When I started this lab, the intention was to use CentOS as one of the options, but I was not able to get it to work. A lot of online research led me to believe that the entire ISO is to be packaged into an initrd image and sent over through TFTP!! (source At that point, I might as well build a bootable flash drive. If anyone knows how to boot CentOS live over NFS, please post a comment.