Posts here are mostly step-by-step guides on how to replicate something I have set up in the past. Read over my About page to see how I show commands/output and read the disclaimer.
My Ubuntu deployment server setup provides PXE boot support for network installations, preseeding, apt mirror, and memtest as a bonus. This article documents how to replicate this setup.
This guide assumes existing knowledge in Ubuntu Server, PXE, dnsmasq.
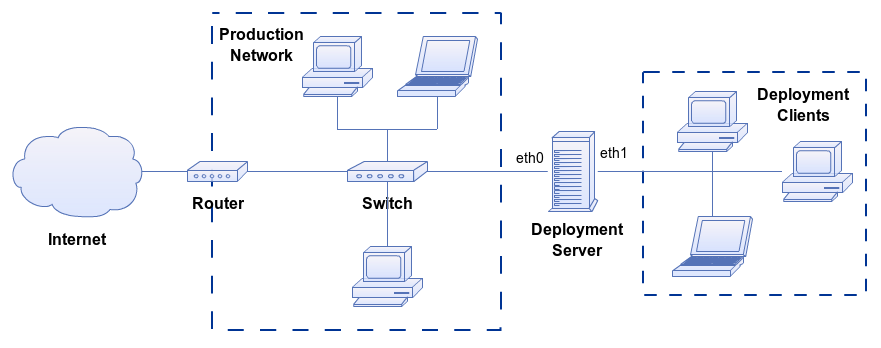
I built a server that sits between two networks – my main production network, and a network that the deployment clients sit in during OS installation. The physical arrangement of the environment looks something like this:
Base OS Installation
Install Ubuntu Server 12.04. When partitioning, note that up to 200GB of data will need to go somewhere – preferably /var/spool/apt-mirror. If you have the option to make this path a separate partition or drive, do that. In the tasksel options, select SSH. That should be enough to get going.
Be sure we are on the latest updates:
[root]$ apt-get update
[root]$ apt-get dist-upgrade
Some basic reminders: Set account passwords, bash prompts, etc.
Network Configuration
Configure the network interfaces to something like this. The idea is to statically configure one of the interfaces for the PXE and DHCP server to function. The iptables rules are for internet routing.
[root]$ vim /etc/network/interfaces
auto eth0
iface eth0 inet dhcp
    post-up iptables-restore < /etc/iptables.up.rules

auto eth1
iface eth1 inet static
    address 192.168.15.254
    netmask 255.255.255.0
    network 192.168.15.0
    broadcast 192.168.15.255
Since this machine will be serving as a DNS server, we need the hostname to be pointing to the non-local IP address, so if the server name is dev-deploy.example.com, and the IP address is 192.168.15.254, that entry in /etc/hosts will contain something like this:
192.168.15.254 dev-deploy dev-deploy.example.com
Internet Routing
The clients that are on the eth1 side may require internet access. The easiest way to do this is to configure NAT. This set of commands will allow a computer connected to the internal interface to access the outside network.
Clear out any existing rules.
[root]$ iptables --flush
[root]$ iptables --table nat --flush
[root]$ iptables --delete-chain
[root]$ iptables --table nat --delete-chain
Configure NAT rules. These commands assume eth0 is connected to the outside network/internet.
[root]$ iptables --table nat --append POSTROUTING --out-interface eth0 -j MASQUERADE
[root]$ iptables --append FORWARD --in-interface eth1 -j ACCEPT
Configure iptables to restore the rules when eth0 comes back up.
[root]$ iptables-save > /etc/iptables.up.rules
Make sure this entry is in /etc/network/interfaces under eth0. (It should if the network setup section was followed)
post-up iptables-restore < /etc/iptables.up.rules
Enable IP routing.
[root]$ echo 1 > /proc/sys/net/ipv4/ip_forward
Make IP routing stick across reboots:
[root]$ vim /etc/sysctl.conf
#...
# Uncomment the next line to enable packet forwarding for IPv4
net.ipv4.ip_forward=1
#...
dnsmasq
DNSMasq is my preferred application for PXE booting clients. This allows us to configure DHCP, DNS, and TFTP all in one go.
[root]$ apt-get install dnsmasq
We are going to start from a blank config file instead of using /etc/dnsmasq.conf
[root]$ vim /etc/dnsmasq.d/pxe.conf
We are going to add to the file later, but let's start with this:
# We only want this running on the interface facing the dedicated PXE network
interface=eth1

# Adding the unique domain name allows me to see that I'm in the PXE subnet
expand-hosts
domain=pxe.example.com

# PXE Subnet
dhcp-range=192.168.15.100,192.168.15.200,12h
Restart dnsmasq.
[root]$ service dnsmasq restart
Checkpoint One
- Reboot dev-deploy
- Verify that
eth0is up with an IP address from the production network. - Ping
google.comor something to verify connectivity. - Verify that
eth1is up and has the correct IP address configured. - Boot up a spare laptop/desktop with a working OS installed.
- Connect the spare machine to
eth1ofdev-deploy. - Verify that the spare machine received an IP address and can reach the internet.
Apache/PHP
Install the basic web server packages. There is no real web server configuration yet.
[root]$ apt-get install apache2 php5
PXE Boot Support
The first step is to add the config to serve the PXE options through DHCP.
[root]$ vim /etc/dnsmasq.d/pxe.conf
Add these lines:
# PXE Boot Options
pxe-service=x86PC, "Boot from local disk"
pxe-service=x86PC, "----"
pxe-service=x86PC, "----"
pxe-service=x86PC, "Ubuntu OS Deployment - DATA LOSS AHEAD!!", pxelinux

# TFTP Configuration
enable-tftp
tftp-root=/var/lib/tftpboot
Restart dnsmasq.
[root]$ service dnsmasq restart
What are we doing here? The first block configures the menu items. The first three lines will boot the local HDD. I have the deployment option several options down to prevent accidental selection. The last few options configure TFTP.
I have that data loss warning in there because some of my deployment scripts will partition HDDs without prompting. I don't want to be at risk of a friend booting up their laptop after plugging it into my deployment network by mistake.
Adding the Ubuntu Network Installer
At this point, you technically have a working PXE boot environment. If you were to PXE boot a computer to this network, you will see the menu we defined above. Granted, we could not select that Ubuntu OS Deployment option because it's not setup yet. Let's do that now.
To better understand the process of configuring the network installer, I initially followed the procedure in this article. This article wanted the entire netboot.tar.gz file downloaded & extracted, but this is just too complicated. I am going to heavily modify the menus, and I don't want to start with something already complex.
So we are going to simplify. You can download the entire archive, but most of the files will not be used. Study the directory listing below. These are the only needed files.
Download the files from these directories: i386 / amd64
/var/lib/tftpboot
├── pxelinux.0
├── pxelinux.cfg
│   └── default
├── ubuntu
│   ├── amd64
│   │   ├── initrd.gz
│   │   └── linux
│   └── i386
│       ├── initrd.gz
│       └── linux
└── vesamenu.c32
For the lazy, here are the commands to build that file/directory structure.
[root]$ mkdir -p /var/lib/tftpboot/pxelinux.cfg
[root]$ mkdir -p /var/lib/tftpboot/ubuntu/{amd64,i386}
[root]$ cd /var/lib/tftpboot/ubuntu/amd64
[root]$ wget http://archive.ubuntu.com/ubuntu/dists/precise-updates/main/installer-amd64/current/images/netboot/ubuntu-installer/amd64/linux
[root]$ wget http://archive.ubuntu.com/ubuntu/dists/precise-updates/main/installer-amd64/current/images/netboot/ubuntu-installer/amd64/initrd.gz
[root]$ cd /var/lib/tftpboot/ubuntu/i386
[root]$ wget http://archive.ubuntu.com/ubuntu/dists/precise-updates/main/installer-i386/current/images/netboot/ubuntu-installer/i386/initrd.gz
[root]$ wget http://archive.ubuntu.com/ubuntu/dists/precise-updates/main/installer-i386/current/images/netboot/ubuntu-installer/i386/linux
[root]$ cd /var/lib/tftpboot
[root]$ wget http://archive.ubuntu.com/ubuntu/dists/precise-updates/main/installer-i386/current/images/netboot/ubuntu-installer/i386/pxelinux.0
[root]$ wget http://archive.ubuntu.com/ubuntu/dists/precise-updates/main/installer-i386/current/images/netboot/ubuntu-installer/i386/boot-screens/vesamenu.c32
Here is a simple version of the boot menu that we can send to clients. We will add more complicated menu options later when we configure preseeding.
[root]$ vim /var/lib/tftpboot/pxelinux.cfg/default
menu title Ubuntu Automated Install Options

label precise_custom
        menu label ^Ubuntu i386 - No Preseed
        kernel ubuntu/i386/linux
        append vga=788 initrd=ubuntu/i386/initrd.gz -- quiet

default vesamenu.c32
prompt 0
timeout 0
Note that we did download the boot files for both i386 and amd64 systems. This menu only adds i386. If you want to change that, run a search/replace on i386 to amd64.
Checkpoint Two
- Connect a test computer to the deployment network, and boot it up selecting PXE boot on the client machine. The computer may give you an F-key to hit to change boot order, or refer to your BIOS documentation.
- Once at the PXE menu, select
Ubuntu OS Deployment - DATA LOSS AHEAD!! - Select
Ubuntu i386 - No Preseedfrom the Grub menu. The Ubuntu installation should then kick off.
At this point, you know the Ubuntu net installer is being served over PXE. If you have never gone through the alternate installer, I would recommend doing that so you understand the preseeding options we create later.
Ubuntu/Debian Preseeding
So far, we have built a fully functional deployment server. You just completed booting a computer from the deployment server and installed Ubuntu. Let's take a moment and reflect on the moment that you installed Ubuntu without any installation media. You can just as easily take this server and connect 30 clients for a huge install-fest. Oh yeah, there is that problem of completing the install wizard 30 times. Selecting your keyboard language - 30 times. Typing in the mirror location - 30 times. Thankfully, there is a way to make this even more efficient with preseeding.
Ubuntu has a pretty well commented preseed file, but we are going to use a slightly different one.
Here is one I have previously prepared:
[root]$ mkdir /var/www/cfg
[root]$ cd /var/www/cfg
[root]$ wget http://wellsie.net/files/69/preseed.cfg
Make the following changes to this file:
- If you are not in the US, update the mirror on line 11 with your country code, or just point to
archive.ubuntu.com. - Check out the user accout settings on lines 45 - 50. Change accordingly. I wouldn't worry about the passwords though. Change those after the system is up.
- See line 60 - I recommend sticking with the server install during testing - it goes faster. When you are ready to change it, swap lines 60 and 61.
Now we need to add a Grub menu entry that calls up this preseed file. Modify /var/lib/tftpboot/pxelinux.cfg/default, and add this content.
label precise_i386_server
    menu label ^Ubuntu Server 12.04 i386 - AUTO PARTITION
    kernel ubuntu/i386/linux
    append netcfg/get_hostname=pxe-install locale=en_US preseed/locale=en_US keyboard-configuration/layoutcode=en_US console-setup/ask_detect=false netcfg/choose_interface=eth0 url=http://dev-deploy/cfg/preseed.cfg vga=788 initrd=ubuntu/i386/initrd.gz -- quiet
Yes, those language prompts and hostname are required! The installer asks keyboard information before setting up the NIC and downloading the preseed file, so it must be specified here. Want the machine to have a unique hostname? Hit Tab at the menu entry and modify the menu entry before booting. I do not know of an easier way to set the hostname at install time.
Checkpoint Three
- Connect a computer to the deployment network.
- PXE boot it.
- Once at the PXE menu, select
Ubuntu OS Deployment - DATA LOSS AHEAD!! - In the Grub menu, select our new option -
Ubuntu Server 12.04 i386 - AUTO PARTITION, DO NOT PRESS ENTER YET - Hit TAB, and adjust the hostname as desired.
- Hit Enter, sit back, and watch Ubuntu install with no additional input.
Apt-Mirror
The only way this process could be more efficient would be if we had a local source for software packages. My favorite method is using apt-mirror. This will require you to download ~100 GB of data, so this may not be feasible on your internet connection. You may skip this section if that is the case.
[root]$ apt-get install apt-mirror
All settings and mirrors to download belong in /etc/apt/mirror.list. Make note of the path to store the mirrored files. The default path is /var/spool/apt-mirror. You are probably going to want to change this, depending on how you have your system partitioned. If you do, make sure to update the path in the config file. Only base_path needs to be updated.
[root]$ vim /etc/apt/mirror.list
############# config ################## # set base_path /var/spool/apt-mirror # # set mirror_path $base_path/mirror # set skel_path $base_path/skel # set var_path $base_path/var # set cleanscript $var_path/clean.sh # set defaultarch# set postmirror_script $var_path/postmirror.sh # set run_postmirror 0 set nthreads 4 set limit_rate 800k set _tilde 0 # ############# end config ############## deb-amd64 http://archive.ubuntu.com/ubuntu precise main restricted universe multiverse deb-amd64 http://archive.ubuntu.com/ubuntu precise-security main restricted universe multiverse deb-amd64 http://archive.ubuntu.com/ubuntu precise-updates main restricted universe multiverse deb-amd64 http://archive.ubuntu.com/ubuntu precise-proposed main restricted universe multiverse deb-amd64 http://archive.ubuntu.com/ubuntu precise-backports main restricted universe multiverse deb-amd64 http://archive.ubuntu.com/ubuntu precise main/debian-installer restricted/debian-installer universe/debian-installer multiverse/debian-installer deb-amd64 http://archive.ubuntu.com/ubuntu precise-security main/debian-installer restricted/debian-installer universe/debian-installer multiverse/debian-installer deb-amd64 http://archive.ubuntu.com/ubuntu precise-updates main/debian-installer restricted/debian-installer universe/debian-installer multiverse/debian-installer deb-amd64 http://archive.ubuntu.com/ubuntu precise-backports main/debian-installer restricted/debian-installer universe/debian-installer multiverse/debian-installer deb-src http://archive.ubuntu.com/ubuntu precise main restricted universe multiverse deb-src http://archive.ubuntu.com/ubuntu precise-security main restricted universe multiverse deb-src http://archive.ubuntu.com/ubuntu precise-updates main restricted universe multiverse deb-src http://archive.ubuntu.com/ubuntu precise-proposed main restricted universe multiverse deb-src http://archive.ubuntu.com/ubuntu precise-backports main restricted universe multiverse clean http://archive.ubuntu.com/ubuntu
Just like the previous sections, we are doing i386 only, but you should be able to see which lines to change/duplicate if you want amd64 or both. Be advised of the significantly larger download and storage requirements if you go with both.
If you need to adjust the bandwidth consumed during the mirror sync, use the options set nthreads and set limit_rate. The way I have it here, it will use ~16Mb during a sync.
Now that you have it configured, run this command to download the packages. See you back here in a couple days when it's done 🙂
[root]$ apt-mirror /etc/apt/mirror.list
If the application is ever ran as root (like just now), fix the file permissions. The cron script we use later will run as apt-mirror. Change /var/spool/apt-mirror to the path of your packages if you are not using the default.
[root]$ chown -R apt-mirror:apt-mirror /var/spool/apt-mirror
Speaking of that cron script, here it is. I believe this file is created with the apt-mirror package. It just needs to be uncommented. Uncomment the cron line and note time that it runs. Change as necessary.
[root]$ vim /etc/cron.d/apt-mirror
Finally, we need to link the packages from the web root. We are using Apache to serve other files - not just mirrors, so I recommend to place all mirror links in a subdirectory. Yes, we are only mirroring Ubuntu's repository for now, but you may want to add more later.
Take a look at how /var/spool/apt-mirror/mirror is laid out. Hopefully you used a local mirror instead of archive.ubuntu.com, so your directory structure will be different here. The goal is to link the Ubuntu folder in the mirror to /var/www/mirrors/ubuntu. For me, it will look like this.
[root]$ mkdir /var/www/mirrors
[root]$ ln -s /var2/spool/apt-mirror/mirror/mirror.anl.gov/pub/ubuntu /var/www/mirrors/ubuntu
So what do you know about my setup based on that last command? First, I decided to store my mirror files in an alternate location. It's an external HDD mounted to /var2. I am also using a local mirror - mirror.anl.gov because they are only a few miles away from me. Your setup will very likely vary.
At this point, you can point an Ubuntu 12.04 box to this server and pull updates from it. That sounds like a good checkpoint!
How to Use the Local Mirror
The preseed file we downloaded earlier was configured to use an external mirror, but I left in some commented lines to use alternate mirrors for your convenience. Let's activate them.
[root]$ vim /var/www/cfg/preseed.cfg
Comment this line (should be line ~11):
d-i mirror/http/mirror select us.archive.ubuntu.com
Uncomment the 4 lines below the line you just commented. Also uncomment the 4-line block around line 55.
Checkpoint Four
- Connect a test box running Ubuntu 12.04 so it can see
dev-deploy. Preferably on the deployment client side. (see the diagram at the top) - Fire up a web browser and navigate to
http://dev-deploy/mirrors/ubuntu/. You should see a directory listing showingdistsandpool. - On the client machine, Rename the
sources.listfile.
[root]$ mv /etc/apt/sources.list /etc/sources.list.backup
- Create a new
sources.listfile to be something like this. Adjust for your hostname.
deb http://dev-deploy/mirrors/ubuntu/ precise main restricted universe multiverse
deb http://dev-deploy/mirrors/ubuntu/ precise-updates main restricted universe multiverse
deb http://dev-deploy/mirrors/ubuntu/ precise-security main restricted universe multiverse
deb http://dev-deploy/mirrors/ubuntu/ precise-backports main restricted universe multiverse
deb-src http://dev-deploy/mirrors/ubuntu/ precise main restricted universe multiverse
deb-src http://dev-deploy/mirrors/ubuntu/ precise-updates main restricted universe multiverse
deb-src http://dev-deploy/mirrors/ubuntu/ precise-security main restricted universe multiverse
deb-src http://dev-deploy/mirrors/ubuntu/ precise-backports main restricted universe multiverse
- Update the package index files on the client machine. You should see it download package indexes from
dev-deploywith no errors.
[root]$ apt-get update
Conclusion
You now have a working deployment server. Where do you go from here? Start building your own customized preseed files, and add them to your grub boot menu. Note that these preseed files are served up by Apache, and the file extensions do not matter. You can surely build your preseed files dynamically using PHP/Python/etc. You have several options on how to build your own deployment environment. Have fun!
If you clinged closely to this guide and don't feel comfortable venturing out on your own yet, read up on how the Grub menu works as well as dnsmasq and PXE. Or post a comment on where you are stuck. I will do my best to respond.
Appendix I - Memtest
Memtest is great for verifying all sections of memory are working properly. This is typically used in troubleshooting boot or hardware issues, so it's typically used in the form of a bootable image. Most people run this off of bootable media, but you have a PXE server now, so why not use that?
Download and extract the pre-compiled, bootable binary.
[root]$ mkdir /var/lib/tftpboot/other
[root]$ cd /var/lib/tftpboot/other
[root]$ wget http://www.memtest.org/download/5.01/memtest86+-5.01.bin.gz
[root]$ gzip -d memtest86+-5.01.bin.gz
[root]$ mv memtest86+-5.01.bin memtest
Add this to /var/lib/tftpboot/pxelinux.cfg/default.
label memtest
    menu label Memtest
    root (hd0,0)
    kernel other/memtest
This is a convenient way to run a quick memtest without rooting around for media to boot from. Be careful though! You just placed a harmless memtest option right next to a boot option that hoses all data on the HDD!! Use with caution.