Posts here are mostly step-by-step guides on how to replicate something I have set up in the past. Read over my About page to see how I show commands/output and read the disclaimer.
The Linux Terminal Server Project is a great way to give old machines new life. LTSP (usually) consists of a single server that network boots several clients. These clients run the OS and most applications off this main server, so your client machines can be old hardware, thin clients, etc. Setting it up is pretty easy and only takes a couple steps beyond the initial operating system installation.
This guide assumes some existing knowledge of Ubuntu 12.04, network interface configuration, dnsmasq, and PXE.
Base OS Installation
Install/Deploy Xubuntu 12.04, or your other desktop of choice. Basic OS installation steps are not included here. Personally, I use a deployment server. I recommend installing the 64-bit version of whatever desktop version you go with.
Be sure we are on the latest updates:
[root]$ apt-get update [root]$ apt-get dist-upgrade |
Some basic reminders: Set your account passwords, including root.
Networking Setup
This setup is going to be designed for two physical interfaces. When I am setting up a server for anything that uses routing, I will use eth0 for the external network, and eth1 for the internal network. For this setup, our networking setup will something like this:
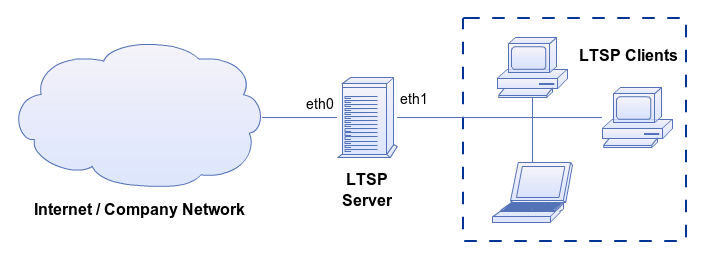
The PXE network is going to be in the 192.168.20.0/24 network. Feel free to modify accordingly.
[root]$ vim /etc/network/interfaces |
auto lo
iface lo inet loopback

auto eth0
iface eth0 inet dhcp

auto eth1
iface eth1 inet static
        address 192.168.20.254
        netmask 255.255.255.0
        network 192.168.20.0
        broadcast 192.168.20.255
DNSMASq
Supporting the initial PXE boot environment basically involves setting up the DHCP and TFTP server. When installing the ltsp-server-standalone package, that environment is configured automatically, but I prefer dnsmasq.
[root]$ apt-get install dnsmasq |
Instead of modifying the main config file (/etc/dnsmasq.conf), we are going to drop in an additional config file into the /etc/dnsmasq.d/ directory. This makes it easier to see the changes we are making without scrolling through several likes of commented out options. If this is your first time working with dnsmasq, I recommend you look through the included config file for the full context of what we are doing.
[root]$ vim /etc/dnsmasq.d/pxe.conf |
Copy in the below contents; edit as necessary.
# We only want this running on the interface facing the dedicated PXE network
interface=eth1

# Adding the unique domain name allows me to see that I'm in the PXE subnet
expand-hosts
domain=pxe.example.net

# PXE Subnet
dhcp-range=192.168.20.100,192.168.20.200,12h

# PXE Boot Options
pxe-service=x86PC, "Boot from local disk"
pxe-service=x86PC, "Ubuntu 12.04 amd64", /ltsp/amd64/pxelinux
pxe-service=x86PC, "Ubuntu 12.04 i386", /ltsp/i386/pxelinux

# TFTP Configuration
enable-tftp
tftp-root=/var/lib/tftpboot
Restart DNSMasq.
[root]$ service dnsmasq restart |
LTSP-Server
The main event! Install the ltsp-server package.
[root]$ apt-get install ltsp-server |
Now if you are into the absolute easiest way to get started, you can be up and running with one simple command.
[root]$ ltsp-build-client |
- The server we built is of the amd64 type. This means that we can only boot amd64 clients by default. This was a quick problem for me because I am using this on some old hardware, some of it doesn’t even support 64-bit code. So, we need to build two images.
- This command will build a complete chroot environment, and that requires download a few packages, especially if you are doing multiple architectures. You will probably want to use a local mirror.
So we want to run this twice, one for i386 clients, and one for the clients that can run amd64. I also specified the default ubuntu package mirrors, but you are going to want to use one that is closer to you.
[root]$ ltsp-build-client --mirror "http://archive.ubuntu.com/ubuntu" --security-mirror "http://security.ubuntu.com/ubuntu" --updates-mirror "http://security.ubuntu.com/ubuntu" --arch amd64 [root]$ ltsp-build-client --mirror "http://archive.ubuntu.com/ubuntu" --security-mirror "http://security.ubuntu.com/ubuntu" --updates-mirror "http://security.ubuntu.com/ubuntu" --arch i386 |
After these clients are finished booting, connect a client device that supports PXE booting and connect to eth1 of the LTSP server. You should be able to select the CPU architecture from the PXE boot menu.
Possible Issue – Ubuntu LTSP Clients Dropping to Busybox Shell
It was common for me to see the clients drop to a Busybox shell when attempting to boot. It seems that this is usually caused by nbd-server not running on the PXE server – pretty simple, right? The solution is to start the service or reboot the PXE server.
[root]$ service nbd-server restart
Hello Andrew,
I was reading up on LTSP and cane across your posts on the topic, and thank you for them. I was wondering if it is possible to use the same environment as you diagrammed above, but instead of one server two or more in a farm that brokers or load balances users as they log on?
Kind regards,
Dave
Hi Dave,
Yes, LTSP clusters are common for large numbers of thin clients. Typically, there would be a file server, an openLDAP server, and one more more app servers. Here is an (admittedly old) article on the topic: https://help.ubuntu.com/community/UbuntuLTSP/LTSP-Cluster
These articles do not use DNSMasq though, so it may have to be adapted for your setup.